


Setting Up Secure Remote Access with ProxyJump and Cloudflare
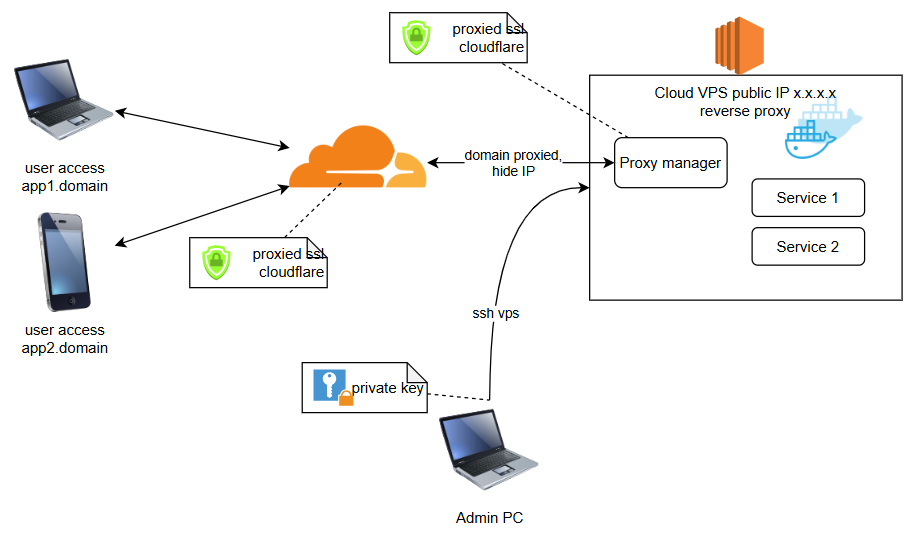
Prerequisites
- A VPS with SSH access
- A domain name configured with Cloudflare
- Local machine running your application
- OpenSSH client installed
Step 1: SSH Configuration Setup
Edit your SSH config file on your local machine:
nano ~/.ssh/config
Add the following configuration:
Host jumphost
    HostName your-vps-ip
    User your-vps-username
    Port 22
    IdentityFile ~/.ssh/id_rsa

Host internal-service
    HostName localhost
    User local-username
    Port 3000
    ProxyJump jumphost
Step 2: Generate SSH Keys
Create SSH keys if you haven’t already:
# Generate SSH key pair
ssh-keygen -t ed25519 -C "[email protected]"

# Copy public key to VPS
ssh-copy-id -i ~/.ssh/id_ed25519.pub your-vps-username@your-vps-ip
Step 3: Configure Nginx on VPS
Install and configure Nginx as reverse proxy:
server {
    listen 80;
    server_name your-domain.com;

    location / {
        proxy_pass <http://localhost:3000>;
        proxy_set_header Host $host;
        proxy_set_header X-Real-IP $remote_addr;
        proxy_set_header X-Forwarded-For $proxy_add_x_forwarded_for;
        proxy_set_header X-Forwarded-Proto $scheme;
    }
}
Step 4: Create SSH Tunnel
Establish the tunnel using ProxyJump:
# Forward local port 3000 through the jump host
ssh -J jumphost -L 3000:localhost:3000 internal-service
Step 5: Cloudflare Configuration
- Enable Full (strict) SSL mode in Cloudflare
- Create an A record pointing to your VPS IP
- Enable proxy (orange cloud)
- Configure Cloudflare SSL/TLS settings
Security Hardening
- Configure SSH to only allow key-based authentication:
# Edit SSH config on VPS
sudo nano /etc/ssh/sshd_config

# Set these options
PasswordAuthentication no
PermitRootLogin no
PubkeyAuthentication yes
Firewall Setup
Configure UFW on VPS:
sudo ufw allow OpenSSH
sudo ufw allow 'Nginx Full'
sudo ufw enable
Monitoring Connection
- Check SSH tunnel status:
netstat -tulpn | grep 3000 - Monitor Nginx access logs:
tail -f /var/log/nginx/access.log - Check SSH connections:
whoorw
Automation Script
Create a connection script on your local machine:
#!/bin/bash
echo "Establishing secure tunnel..."
ssh -J jumphost -L 3000:localhost:3000 internal-service -N
Make it executable:
chmod +x tunnel.sh
Troubleshooting
- Verify SSH connection:
ssh -v -J jumphost internal-service - Check Nginx configuration:
nginx -t - Verify port forwarding:
lsof -i :3000 - Monitor SSH logs:
tail -f /var/log/auth.log
Very good article — clear, accurate, and helpful.
The site itself is a fantastic source of useful information.
My homepage; Artroxal состав